

© 2020 - 2021 Keen Electronics Limited
e-mail: sales@keenelectronics.co.uk Telephone: 07500 24 11 33
127, New Road, Bromham, Chippenham, Wiltshire, SN15 2JA
Company Registration No: 2613501 VAT Registration No 596069885

Keen Electronics Limited


<< Back to Product
INSTALLATION INSTRUCTIONS - THE BOAT ALARM with DIALLER
INTRODUCTION
The BOAT ALARM & DIALLER is straightforward to install, BUT PLEASE TAKE A COUPLE OF MINUTES TO READ THESE INSTRUCTIONS !
The alarm system consists of the following components :
- Control box with integral re-chargeable lead acid battery, inverter/charger, alarm and dialler PCBs. The control box can be disconnected after installation for testing or fault finding. It can be mounted in any convenient location where connections can be made easily. Where possible use the aerial on the flying lead to obtain the best performance from the dialler.
- Splash proof siren This can be mounted anywhere where it is hidden and difficult for a thief to get at. Position the siren so the sound can be heard outside the boat.
- Key Fobs - carried by the users
PIR head - this can be used to protect the deck area underneath the deck cover. Position in a sheltered location where it will detect an intruder - Door Switches - these are used to protect doors and lockers. Always fit one to the cabin door.
- Strobe Light - should be located as high as practical to identify your boat when the alarm is sounding
- Relay - can be used to switch the boat’s horn (OPTIONAL)
INSTALLATION
Do not connect the alarm to the 12 Volt battery until all other connections have been made. The alarm should be connected directly to the battery (so that the alarm will work when the battery isolator switch is in the OFF position) Always use a 2 Ampere in line fuse fitted close to the battery.
It's well worth spending a few minutes deciding where to fit the alarm system’s components. The wiring diagram shows how the system is connected.
Control box
Once its location has been decided screw the control box in place. Connections are made using the rising clamp terminal blocks on the terminal board. The terminal blocks are fitted with wire protectors so it is not necessary to use ferrules.
Siren
Remove the mounting bracket fixing screws, then screw the mounting bracket in the desired position. Re-fit the siren body into its mounting bracket and re-fit the fixing screws; ensure these are reasonably tight. Use the 2-way terminal block to connect the siren wires to the wires going to the control box and fix the terminal block in place.
PIR Head
This should be mounted a couple of feet off the deck "looking across" the deck. Avoid mounting the PIR head where it is directly facing the sky or where it will get wet. Remove the front half of the case by undoing the single screw near the top then carefully lowering it. The PIR head should be mounted using the screws supplied.
Connect the three wires from the control box to the PIR as shown on the wiring diagram. Refit the front half of the case and fix it in place with the single fixing screw. FOR FURTHER INFORMATION REFER TO THE SEPARATE SHEET SUPPLIED WITH THE PIR.
Door Switches
These should be fitted to doors, windows and/or lockers that require protection. The switch is fitted to the frame and the magnet to the door. It is recommended that they are fitted as high as practical and on the hinge side of the door or locker. The switches are connected in series as shown in the wiring diagram. Do not over tighten the fixing screws.
Strobe
Mount in a position where it will be visible. Connect in parallel with the siren, observe correct polarity
Relay
Connect as shown in the wiring diagram using spade connectors. Fix to a suitable surface.
ELECTRICAL CONNECTIONS
Please refer to the wiring diagram.
Connect the door switches to the control box using twin flat loudspeaker cable; polarity is not important.
Connect the siren / strobe to the control box using twin flat loudspeaker cable and the 2-way terminal blocks. Observe correct polarity: RED wires to SIREN+ and BLACK wires to SIREN–.
Connect the PIR head to the control box using 3 core cable as shown in the wiring diagram.
Find a convenient point to connect to the battery isolator switch. Fit a 2 Ampere in line fuse close to the battery isolator switch.
Finally, connect the 12 Volt supply from the battery to the control box. Do not use twin flat speaker cable as it is rather thin for this application. A 0.75mm or 1.0mm cable (24/0.2) or similar is recommended. Fit a 2 Ampere in line fuse close to the battery.
The alarm installation is now complete and ready for testing. Ensure that the key switch is in the anti-clockwise (OFF) position, then re-connect the 12 Volt battery to test the alarm.
OPTIONAL DECK LIGHT CONTROLLER
The button on the key fob, marked LIGHT can be used to switch the deck light if desired. The wiring diagram shows how this should be connected.
On some boats it is easier to use a relay; contact Keen Electronics for a relay and connection details.
WIRING DIAGRAM


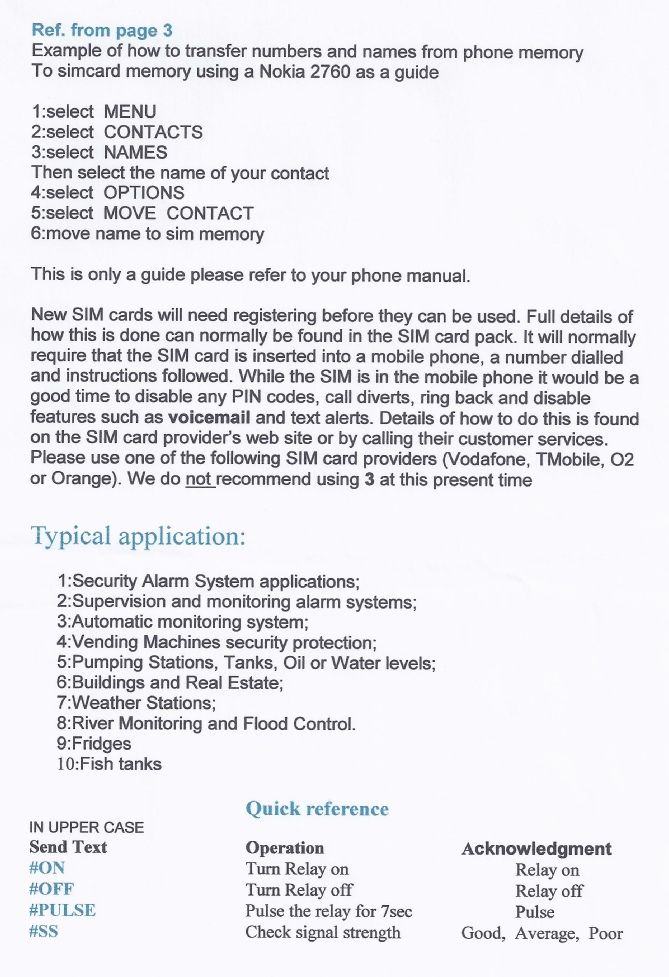


GENERAL & PROGRAMMING INFORMATION ON THE DIALLER